So your yearbook has content, but do you have a cover? Do you have a cover idea, or even a sketch on the back of a napkin? Some schools begin work on the interior first and then design their cover partway through the year. Does that work? Is it the best plan? These are questions that deserve answers!
Your yearbook should ideally go through at least some of the following stages, and I would argue, in this order:
- Choosing a theme.
- Creating a style guide including:
- Selecting your colours and your fonts.
- Choosing or creating basic design templates
- Designing your cover, even if it is not yet fully fleshed out by the time page designing starts.
- Submit your cover by mid-school year. (Our schools are automatically entered into our cover contest!)
- Continuing to design pages and checking back to see if they follow your theme and your cover.

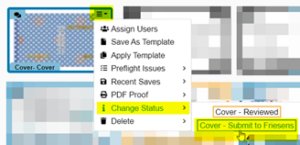
Change the status of your cover in ConnectMe
After your cover is submitted, Friesens takes it from there, and that is when the magic happens! Some amazing things take place after submission. When you hand your cover over to Friesens, your Yearbook Project Specialist will initiate the fantastic voyage it takes through our plant.
The Covers Team begins by reviewing your cover, checking for obvious things such as missing text, low resolution images, backgrounds not bleeding off the ‘wrap,’ among others. They will also ensure your cover matches the details set out in your quote. You should never have any surprises. We’re BIG believers that your invoice should always match your quote.
If there are any elements in the Cover design that need your attention, the Project Specialist will be notified. You may receive an email or call from your Project Specialist with questions or concerns. Don’t worry, you’re not in trouble! We simply want to ensure that your publication is the best it can be. This process can reach a critical juncture because when there is an issue and the plant requests details, we may need answers within a specific window of time, or the job could be put on hold.
Once your cover has been submitted and everything looks great the next thing to look for is an email notifying you that your proof is available in ConnectMe! In the body of the message, you’ll see a link taking you to where you can review your cover proof and approve, or you may request revisions.

Once approved, material is ordered, and your cover has press time scheduled. The next step is impositioning. This is where we calculate how to run covers most efficiently. The purpose is to get the most out of the raw materials and resources required. Once impositioning is complete, and the plant is ready for your cover, printing plates are made, and your cover is ready for printing! After the covers are printed, any foils, laminations, and other cover effects are added.
Perfect Binding
Also called adhesive binding. Perfect binding requires no staples or thread and uses hot or cold glue. Hot melt is more common because it’s economical and dries quickly. Cold glue is an involved process, but has the advantage of allowing the book to lay flat more easily.

Depending on whether you have a soft or hard cover, the route begins to shift a bit. Hardcover books take a slightly different path as the cover boards need to be glued into the cover ‘skin’ with your printed cover design and the additional wrap to the outside edges. Any embossing is done now and then the cover is sent to the encaser. The encaser for both hard and softcover books is a big deal, literally and figuratively. The equipment is huge, and the finished perfect binding is durable, high quality, and strong.
Once bound, die cutting is performed, as well as personalization, and your books are packed up and sent to you to be enjoyed by you and your students. What’s your favorite part of the cover process? Do you have a cover application you enjoy seeing?
Nabil Mouallem – Print Consultant


